File Exists Webstorm Npm Err Move It Away and Try Again
This tutorial shows how a service developer tin troubleshoot a broken Cloud Run service using Stackdriver tools for discovery and a local evolution workflow for investigation.
This step-by-pace "instance report" companion to the troubleshooting guide uses a sample project that results in runtime errors when deployed, which you troubleshoot to detect and fix the problem.
Costs
This tutorial uses the following billable components of Google Deject:
- Deject Build
- Container Registry
- Deject Run
- Cloud Logging
- Error Reporting
To generate a toll gauge based on your projected usage, use the pricing calculator.
Earlier you begin
- Sign in to your Google Deject account. If you're new to Google Cloud, create an account to evaluate how our products perform in real-world scenarios. New customers also get $300 in free credits to run, test, and deploy workloads.
-
In the Google Deject console, on the project selector page, select or create a Google Cloud project.
Go to projection selector
-
Make sure that billing is enabled for your Deject project. Acquire how to cheque if billing is enabled on a project.
-
In the Google Cloud console, on the project selector page, select or create a Google Cloud project.
Get to project selector
-
Make sure that billing is enabled for your Cloud project. Learn how to cheque if billing is enabled on a project.
- Enable the Cloud Run Admin API
- Install and initialize the gcloud CLI.
- Update components:
gcloud components update
- Follow the instructions to install Docker locally
Setting up gcloud defaults
To configure gcloud with defaults for your Deject Run service:
-
Set your default project:
gcloud config ready project PROJECT_ID
Replace PROJECT_ID with the name of the project you created for this tutorial.
-
Configure gcloud for your called region:
gcloud config ready run/region REGION
Replace REGION with the supported Cloud Run region of your option.
Cloud Run locations
Cloud Run is regional, which means the infrastructure that runs your Deject Run services is located in a specific region and is managed past Google to be redundantly available beyond all the zones within that region.
Meeting your latency, availability, or durability requirements are primary factors for selecting the region where your Cloud Run services are run. You can generally select the region nearest to your users simply y'all should consider the location of the other Google Deject products that are used by your Cloud Run service. Using Google Cloud products together across multiple locations can bear upon your service's latency every bit well equally cost.
Cloud Run is bachelor in the post-obit regions:
Subject to Tier i pricing
Discipline to Tier two pricing
If you already created a Cloud Run service, you tin can view the region in the Cloud Run dashboard in the Cloud console.
Assembling the lawmaking
Build a new Cloud Run greeter service step-by-step. Equally a reminder, this service creates a runtime error on purpose for the troubleshooting exercise.
-
Create a new projection:
Node.js
Create a Node.js project by defining the service package, initial dependencies, and some common operations.-
Create a new
hello-servicedirectory:mkdir hello-service cd hello-service -
Create a new Node.js project by generating a
package.jsonfile:npm init --yes npm install --save express@4 -
Open the new
package.jsonfile in your editor and configure astarting timescript to runnode index.js. When yous're done, the file volition await like this:{ "proper name": "hello-service", "version": "ane.0.0", "clarification": "", "main": "index.js", "scripts": { "offset": "node index.js", "test": "echo \"Error: no test specified\" && go out 1" }, "keywords": [], "author": "", "license": "ISC", "dependencies": { "express": "^4.17.i" } }
If you go along to evolve this service beyond the firsthand tutorial, consider filling in the description, author, and evaluate the license. For more details, read the packet.json documentation.
Python
-
Create a new
hullo-servicedirectory:mkdir hello-service cd hello-service -
Create a requirements.txt file and copy your dependencies into it:
Get
-
Create a new
hello-servicedirectory:mkdir hi-service cd hello-service -
Create a Go project past initializing a new go module:
go modernistic init example.com/hello-service
You can update the specific proper name as y'all wish: you should update the name if the code is published to a web-reachable code repository.
Java
-
Create a new maven project:
mvn archetype:generate \ -DgroupId=com.example.cloudrun \ -DartifactId=hello-service \ -DarchetypeArtifactId=maven-archetype-quickstart \ -DinteractiveMode=false -
Copy the dependencies into your
pom.xmldependency list (betwixt the<dependencies>elements): -
Re-create the build setting into your
pom.xml(under the<dependencies>elements):
-
-
Create an HTTP service to handle incoming requests:
-
Create a
Dockerfileto ascertain the container image used to deploy the service:Node.js
Python
Go
Java
This sample uses Jib to build Docker images using mutual Coffee tools. Jib optimizes container builds without the need for a Dockerfile or having Docker installed. Learn more than about edifice Java containers with Jib.
Shipping the code
Aircraft code consists of three steps: edifice a container paradigm with Deject Build, uploading the container image to Container Registry, and deploying the container image to Cloud Run.
To send your code:
-
Build your container and publish on Container Registry:
Node.js
gcloud builds submit --tag gcr.io/PROJECT_ID/hello-service
Where PROJECT_ID is your GCP project ID. You can bank check your electric current project ID with
gcloud config get-value projection.Upon success, yous should encounter a SUCCESS message containing the ID, creation fourth dimension, and paradigm proper noun. The image is stored in Container Registry and can be re-used if desired.
Python
gcloud builds submit --tag gcr.io/PROJECT_ID/hello-service
Where PROJECT_ID is your GCP project ID. You lot can check your current project ID with
gcloud config get-value project.Upon success, you should see a SUCCESS message containing the ID, creation fourth dimension, and prototype proper name. The prototype is stored in Container Registry and tin exist re-used if desired.
Go
gcloud builds submit --tag gcr.io/PROJECT_ID/hi-service
Where PROJECT_ID is your GCP project ID. You can check your current project ID with
gcloud config get-value project.Upon success, y'all should run into a SUCCESS message containing the ID, creation time, and image proper noun. The image is stored in Container Registry and tin be re-used if desired.
Coffee
- Use the gcloud credential helper to authorize Docker to push to your Container Registry.
gcloud auth configure-docker
- Employ the Jib Maven Plugin to build and push the container to Container Registry.
mvn compile jib:build -Dimage=gcr.io/PROJECT_ID/hullo-service
Where PROJECT_ID is your GCP projection ID. You can check your current project ID with
gcloud config get-value project.Upon success, y'all should see a BUILD SUCCESS message. The image is stored in Container Registry and tin can be re-used if desired.
- Use the gcloud credential helper to authorize Docker to push to your Container Registry.
-
Run the post-obit command to deploy your app:
gcloud run deploy hi-service --image gcr.io/PROJECT_ID/hello-service
Supercede PROJECT_ID with your GCP project ID.
hello-serviceis both the container image name and name of the Cloud Run service. Notice that the container epitome is deployed to the service and region that yous configured previously under Setting up gcloudRespond
y, "Yes", to the allow unauthenticated prompt. Run across Managing Admission for more details on IAM-based authentication.Await until the deployment is complete: this can have about half a minute. On success, the command line displays the service URL.
Trying it out
Try out the service to ostend you have successfully deployed it. Requests should fail with a HTTP 500 or 503 error (members of the course 5xx Server errors). The tutorial walks through troubleshooting this error response.
The service is auto-assigned a navigable URL.
-
Navigate to this URL with your web browser:
-
Open up a spider web browser
-
Find the service URL output by the earlier deploy control.
If the deploy command did not provide a URL then something went wrong. Review the mistake message and human action accordingly: if no actionable guidance is present, review the troubleshooting guide and maybe retry the deployment control.
-
Navigate to this URL by copying it into your browser'due south address bar and pressing ENTER.
-
-
View the HTTP 500 or HTTP 503 error.
If y'all receive a HTTP 403 error, you may take rejected
allow unauthenticated invocationsat the deployment prompt. Grant unauthenticated access to the service to fix this:gcloud run services add together-iam-policy-bounden hi-service \ --member="allUsers" \ --role="roles/run.invoker"
For more information, read Allowing public (unauthenticated) access.
Investigating the problem
Visualize that the HTTP 5xx error encountered in a higher place in Trying information technology out was encountered as a product runtime error. This tutorial walks through a formal process for handling it. Although production fault resolution processes vary widely, this tutorial presents a particular sequence of steps to evidence the application of useful tools and techniques.
To investigate this trouble you will work through these phases:
- Collect more details on the reported fault to support farther investigation and set a mitigation strategy.
- Salvage user bear upon by deciding to push forrard in a prepare or rollback to a known-salubrious version.
- Reproduce the error to confirm the correct details have been gathered and that the fault is not a i-time glitch
- Perform a root cause analysis on the issues to find the code, configuration, or process which created this error
At the start of the investigation you have a URL, timestamp, and the message "Internal Server Error".
Gathering further details
Gather more data most the trouble to understand what happened and make up one's mind next steps.
Utilize available Stackdriver tools to collect more than details:
-
Use the Error Reporting console, which provides a dashboard with details and recurrence tracking for errors with a recognized stack trace.
Go to Error Reporting console

Listing of recorded errors. Errors are grouped by message across revisions, services, and platforms. -
Click on the error to see the stack trace details, noting the function calls fabricated merely prior to the error.
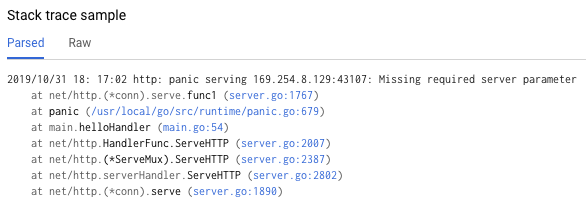
The "Stack trace sample" in the error details page shows a unmarried instance of the error. Yous can review each private instances. -
Use Deject Logging to review the sequence of operations leading to the problem, including error letters that are non included in the Fault Reporting console because of a lack of a recognized fault stack trace:
Go to Deject Logging console
Select Cloud Run Revision > hello-service from the first drib-down box. This will filter the log entries to those generated by your service.
Read more about viewing logs in Cloud Run
Rollback to a healthy version
If this is an established service, known to work, there will be a previous revision of the service on Deject Run. This tutorial uses a new service with no previous versions, and so you cannot do a rollback.
Even so, if you have a service with previous versions you can roll dorsum to, follow Viewing revision details to extract the container proper noun and configuration details necessary to create a new working deployment of your service.
Reproducing the error
Using the details y'all obtained previously, confirm the problem consistently occurs under exam atmospheric condition.
Send the same HTTP request past trying it out once more, and see if the same error and details are reported. Information technology may accept some fourth dimension for error details to show up.
Considering the sample service in this tutorial is read-only and doesn't trigger any complicating side effects, reproducing errors in production is rubber. However, for many existent services, this won't be the case: you may need to reproduce errors in a test surroundings or limit this stride to local investigation.
Reproducing the error establishes the context for further piece of work. For example, if developers cannot reproduce the error further investigation may require boosted instrumentation of the service.
Performing a root cause assay
Root cause analysis is an of import pace in effective troubleshooting to ensure y'all fix the problem instead of a symptom.
Previously in this tutorial, you lot reproduced the problem on Cloud Run which confirms the problem is active when the service is hosted on Cloud Run. At present reproduce the problem locally to decide if the trouble is isolated to the code or if information technology simply emerges in product hosting.
-
If you have not used Docker CLI locally with Container Registry, authenticate it with gcloud:
gcloud auth configure-docker
For alternative approaches encounter Container Registry authentication methods.
-
If the about recently used container image name is not available, the service description has the information of the most recently deployed container epitome:
gcloud run services describe hello-service
Find the container epitome name within the
specobject. A more targeted command can directly retrieve it:gcloud run services depict how-do-you-do-service \ --format="value(spec.template.spec.containers.image)"
This command reveals a container image name such every bit
gcr.io/PROJECT_ID/howdy-service. -
Pull the container image from the Container Registry to your surround, this stride might take several minutes as it downloads the container epitome:
docker pull gcr.io/PROJECT_ID/hello-service
Later updates to the container image that reuse this name can be retrieved with the same control. If you lot skip this footstep, the
docker runcommand below pulls a container image if one is non nowadays on the local machine. -
Run locally to ostend the problem is not unique to Cloud Run:
PORT=8080 && docker run --rm -e PORT=$PORT -p 9000:$PORT \ gcr.io/PROJECT_ID/hello-service
Breaking down the elements of the control above,
- The
PORTenvironment variable is used by the service to determine the port to listen on within the container. - The
runcommand starts the container, defaulting to the entrypoint command divers in the Dockerfile or a parent container image. - The
--rmflag deletes the container instance on exit. - The
-eastwardflag assigns a value to an environment variable.-due east PORT=$PORTis propagating thePORTvariable from the local system into the container with the same variable proper name. - The
-pflag publishes the container every bit a service bachelor on localhost at port 9000. Requests to localhost:9000 will be routed to the container on port 8080. This means output from the service near the port number in employ will not match how the service is accessed. - The terminal argument
gcr.io/PROJECT_ID/how-do-you-do-serviceis a container imagetag, a homo-readable label for a container image's sha256 hash identifier. If not bachelor locally, docker attempts to retrieve the paradigm from a remote registry.
In your browser, open up http://localhost:9000. Check the last output for error messages that match those on Google Cloud's operations suite.
If the trouble is not reproducible locally, it may exist unique to the Deject Run environment. Review the Deject Run troubleshooting guide for specific areas to investigate.
In this case the error is reproduced locally.
- The
Now that the error is doubly-confirmed as persistent and caused by the service code instead of the hosting platform, information technology's time to investigate the code more closely.
For purposes of this tutorial it is safety to assume the lawmaking within the container and the code in the local system is identical.
Revisit the fault report's stack trace and cross-reference with the code to find the specific lines at fault.
Node.js
Find the source of the error bulletin in the fileindex.js around the line number called out in the stack trace shown in the logs: Python
Find the source of the error bulletin in the filemain.py around the line number called out in the stack trace shown in the logs: Go
Find the source of the error message in the file master.go around the line number called out in the stack trace shown in the logs:
Java
Observe the source of the error message in the file App.coffee around the line number chosen out in the stack trace shown in the logs:
Examining this code, the post-obit deportment are taken when the Proper noun surroundings variable is not set:
- An error is logged to Google Cloud's operations suite
- An HTTP error response is sent
The problem is caused by a missing variable, but the root cause is more specific: the code alter calculation the hard dependency on an environment variable did non include related changes to deployment scripts and runtime requirements documentation.
Fixing the root crusade
Now that nosotros have nerveless the code and identified the potential root cause, we tin take steps to fix it.
-
Check whether the service works locally with the
Proper nounenvironment available in place:-
Run the container locally with the surround variable added:
PORT=8080 && docker run --rm -e PORT=$PORT -p 9000:$PORT \ -e NAME="Local Globe!" \ gcr.io/PROJECT_ID/how-do-you-do-service
-
Navigate your browser to http://localhost:9000
-
Meet "Hello Local World!" appear on the page
-
-
Modify the running Cloud Run service environment to include this variable:
-
Run the services update command to add together an environment variable:
gcloud run services update hello-service \ --set-env-vars NAME=Override -
Wait a few seconds while Cloud Run creates a new revision based on the previous revision with the new environment variable added.
-
-
Ostend the service is now stock-still:
- Navigate your browser to the Cloud Run service URL.
- Come across "Howdy Override!" announced on the page.
- Verify that no unexpected messages or errors appear in Deject Logging or Fault Reporting.
Improving time to come troubleshooting speed
In this sample production trouble, the fault was related to operational configuration. There are lawmaking changes that will minimize the touch on of this trouble in the future.
- Improve the error log to include more specific details.
- Instead of returning an error, have the service fall back to a safe default. If using a default represents a change to normal functionality, employ a alert bulletin for monitoring purposes.
Let's step through removing the NAME surroundings variable as a hard dependency.
-
Remove the existing
Proper noun-handling code: -
Add new lawmaking that sets a fallback value:
-
Test locally past re-building and running the container through the affected configuration cases:
Node.js
docker build --tag gcr.io/PROJECT_ID/hello-service .
Python
docker build --tag gcr.io/PROJECT_ID/howdy-service .
Become
docker build --tag gcr.io/PROJECT_ID/hello-service .
Java
mvn compile jib:build
Confirm the
NAMEenvironment variable yet works:PORT=8080 && docker run --rm -e $PORT -p 9000:$PORT \ -e Proper noun="Robust World" \ gcr.io/PROJECT_ID/how-do-you-do-service
Confirm the service works without the
NAMEvariable:PORT=8080 && docker run --rm -e $PORT -p 9000:$PORT \ gcr.io/PROJECT_ID/hello-service
If the service does non return a issue, ostend the removal of lawmaking in the kickoff pace did not remove actress lines, such as those used to write the response.
-
Deploy this past revisiting the Deploy your code section.
Each deployment to a service creates a new revision and automatically starts serving traffic when ready.
To clear the environment variables gear up earlier:
gcloud run services update hello-service --clear-env-vars
Add the new functionality for the default value to automated test coverage for the service.
Finding other issues in the logs
You lot may meet other issues in the Log Viewer for this service. For case, an unsupported arrangement telephone call volition appear in the logs every bit a "Container Sandbox Limitation".
For case, the Node.js services sometimes result in this log message:
Container Sandbox Limitation: Unsupported syscall statx(0xffffff9c,0x3e1ba8e86d88,0x0,0xfff,0x3e1ba8e86970,0x3e1ba8e86a90). Please, refer to https://gvisor.dev/c/linux/amd64/statx for more information. In this case, the lack of support does non impact the hello-service sample service.
Clean upwards
If you created a new project for this tutorial, delete the project. If you used an existing project and wish to proceed it without the changes added in this tutorial, delete resource created for the tutorial.
Deleting the projection
The easiest way to eliminate billing is to delete the project that you created for the tutorial.
To delete the projection:
- In the Cloud console, become to the Manage resources page.
Become to Manage resources
- In the project list, select the project that yous want to delete, so click Delete.
- In the dialog, type the project ID, so click Shut down to delete the project.
Deleting tutorial resources
-
Delete the Deject Run service you lot deployed in this tutorial:
gcloud run services delete SERVICE-Proper noun
Where SERVICE-NAME is your chosen service name.
You can also delete Cloud Run services from the Google Deject panel.
-
Remove the gcloud default region configuration you added during tutorial setup:
gcloud config unset run/region -
Remove the project configuration:
gcloud config unset project -
Delete other Google Cloud resources created in this tutorial:
- Delete the container image named
gcr.io/<var>PROJECT_ID</var>/hello-servicefrom Container Registry.
- Delete the container image named
Source: https://cloud.google.com/run/docs/tutorials/local-troubleshooting
0 Response to "File Exists Webstorm Npm Err Move It Away and Try Again"
แสดงความคิดเห็น